How to Get Notifications for NFT Contract Creations in Three Simple Steps
Learn how to get real-time notifications about a successful NFT contract mint using Alchemy Notify webhooks
If you’re the owner or developer of an NFT collection, getting critical updates about your NFT contract interactions can play a crucial role in the success of your NFT collection. Perhaps, you’re a passionate NFT collector interested in getting the play-by-play progress of your favorite NFT collection. Regardless of your intentions, tracking smart contract on-chain activities can be arduous without the right tools.
Notify API, available on all ETH test and main networks, provides you with reliable webhook types that allow you to get real-time notifications about your smart contract transactions.
In this article, we’ll look at how you can use one of such webhook types, the NFT Activity Webhook, to obtain real-time updates on the NFT collections you’re interested in. To use the NFT activity webhook, you’ll need to create a free alchemy account first.
Overview
In three steps, we will create a webhook and test it to get notifications whenever anyone mints a new NFT from our tracked collection.
With the NFT Activity Webhook, you can track the following:
- All NFT transfers (by providing only a webhook URL),
- All NFT transfers for a particular contract (by providing a webhook URL and an NFT contract address), or
- A specific NFT (by providing a webhook URL, an NFT contract address, and the token id).
For this article, we will be implementing the second option.
1. Set up The Webhook URL
To create the NFT Activity Webhook, we need the following:
- A webhook URL
- NFT address you want to track
Getting A Webhook URL
You can use cloud services like Heroku or even ngrok to generate your webhook URL. For this tutorial, we will be using Heroku.
If you don’t have Heroku CLI set up on your local computer, you can follow our short guide.
For ngrok, run ngrok HTTP 80 from your local terminal and copy the resulting URL. If you don’t have ngrok installed on your computer, open an account, and follow the installation instructions on your dashboard to set up and connect your ngrok account to your local computer. We also have a short setup guide you can follow.
Set up your project
- Create a folder with any name of your choice. In it, we will set up an
index.htmlfile with a basic setup, as shown below. Don’t worry; we will make appropriate edits later.
- Open your folder in your terminal and run
heroku create. Take note of the URL: http://xxxxxxxxx.herokuapp.com/ and other generated information, as we’ll be using them later. If you’re using an IDE like VSCode, right-click on the folder and open it in the integrated terminal. Make sure you add/alchemyhookas a suffix, e.g.,https://immense-ravine-98866.herokuapp.com/alchemyhookwhen using the URL as a webhook URL.
2. Set up the NFT Activity Webhook
We will prepare the webhook manually and programmatically so that you can learn both ways.
You need an alchemy account to use Notify API. If you don’t have one, visit https://www.alchemy.com/ to sign up. It’s fast and easy.
A) Setting up the NFT Activity Webhook Manually
Head to the Alchemy Notify Dashboard to set up your webhook.
- In the Notify dashboard, click on the ‘create webhook’ button highlighted below:

- Select the network type of your NFT contract and fill in the boxes with your desired NFT smart contract address(optional), token id(optional), and the webhook URL we created earlier, as shown below

- Click on the ‘create webhook’ button, and your webhook is up and running! Take note of the webhook id as we will be using it to test notifications.
B) Setting up the NFT Activity Webhook Programmatically
To achieve this, we will:
- Set up basic HTML inputs for the user to submit the following details:
webhook URL and NFT address. - Set up a WebSocket that sends the value of the inputs to the server and displays the result.
- Start a server and create a function that calls the createWebhook API endpoint with the inputs’ value.
The resulting webpage will look like the image shown below. We will be testing this after Step 3

Tip: Retrieve your auth token from the Notify Dashboard by clicking the button below:

Now that we have our create webhook functionality, let’s incorporate more functionalities that will allow the user to begin receiving real-time information from the created NFT Activity webhook.
To achieve this, we will:
- Set up an HTML input for the user to submit the webhook id.
- Create a server function that calls the Update webhook NFT filters API endpoint with the inputs’ value. This helps us register the webhook id to our notification setup.
- Set up a client script that starts listening for notifications and displays the resulting information.
Here’s the complete code that implements the above steps:
Additions for the index.html file are lines 9-13, 28-31, 36-45 and 70 Additions for the server.js file are lines 25-27, 30-34 and 36-54
You can also find the entire code in this git repository.
Awesome. We’re almost there! Deploy your code to Heroku by running the following code from your command line:
Now, head over to your browser and visit the Heroku URL. e.g https://immense-ravine-98866.herokuapp.com/

3. Test your Webhook
-
Fill in the ‘create webhook’ section with the desired
NFT contract Address and webhook URLand click theCreate Your NFT Webhook Button! -
Now, head to the Notify Dashboard, and you should find your new webhook there. Exciting!

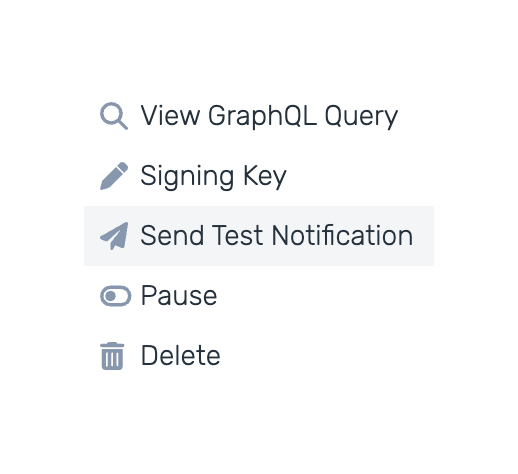
Tip: Click the ellipsis button on the far right to retrieve your webhook signing key and pause or delete the specific webhook. You can also use the webhook signing key to validate and secure your dApp integration of Notify API endpoints.
You should also receive a fanciful notification in your browser.

-
Copy your webhook id from the Notify Dashboard, put it in the “webhook id” input box and click “Enable Notifications to enable notifications.
-
Go back to the Notify Dashboard and send a test notification. To do that, click on the “Send Test Notification” option, as shown below.
Return to your browser, and voila, you get your first notification!

Your webhook is ready! Anytime someone mints an NFT successfully from your collection, you get a response like the code snippet below containing critical details about the transaction.
Next Steps
This is just the beginning. You can do so much more with Notify’s powerful NFT Activity Webhook.
For example,
-
You can integrate these real-time notifications into your dApp as we did with the Building a dApp with Real-Time Transaction Notifications guide using the Address Activity webhook. This tutorial inspired ours - check it out!
-
You can even create a Slack bot that alerts you whenever a new minting notification comes up, as we did with the How to Create a Whale Alert Slack Bot guide using the Address Activity Webhook.
-
You can also create a Twitter bot to alert you in real-time using the How to Create a Whale Alert Twitter Bot tutorial.
The possibilities are endless, and we’re excited to see what you build with the Notify API Endpoints.
Feel free to share your end products with us on Discord.
You can also check out the Notify API Quickstart page for other webhook types you can integrate into your dApp.