How to Deploy a Contract to the Same Address on Multiple Networks
This two-part tutorial will explore two ways you can deterministically deploy a contract across multiple networks.
How to deploy a contract to the same address on multiple networks (Part 1) Create2: An alternative to deriving contract addresses (Part 2)
When you deploy a smart contract to the Ethereum network, the address is derived from your wallet address, the wallet’s transaction count (i.e., the nonce), and your contract’s bytecode. This ensures that each contract deployed to Ethereum has a unique address.
However, perhaps you want to deploy your contract across multiple networks with the same address. For example, you might want to deploy on Ethereum, Polygon, and Optimism with the same address. This can be useful for testing purposes and helpful to users interacting with your addresses across various networks. To do this, you must ensure your wallet’s nonce is equivalent on each network, as illustrated below:
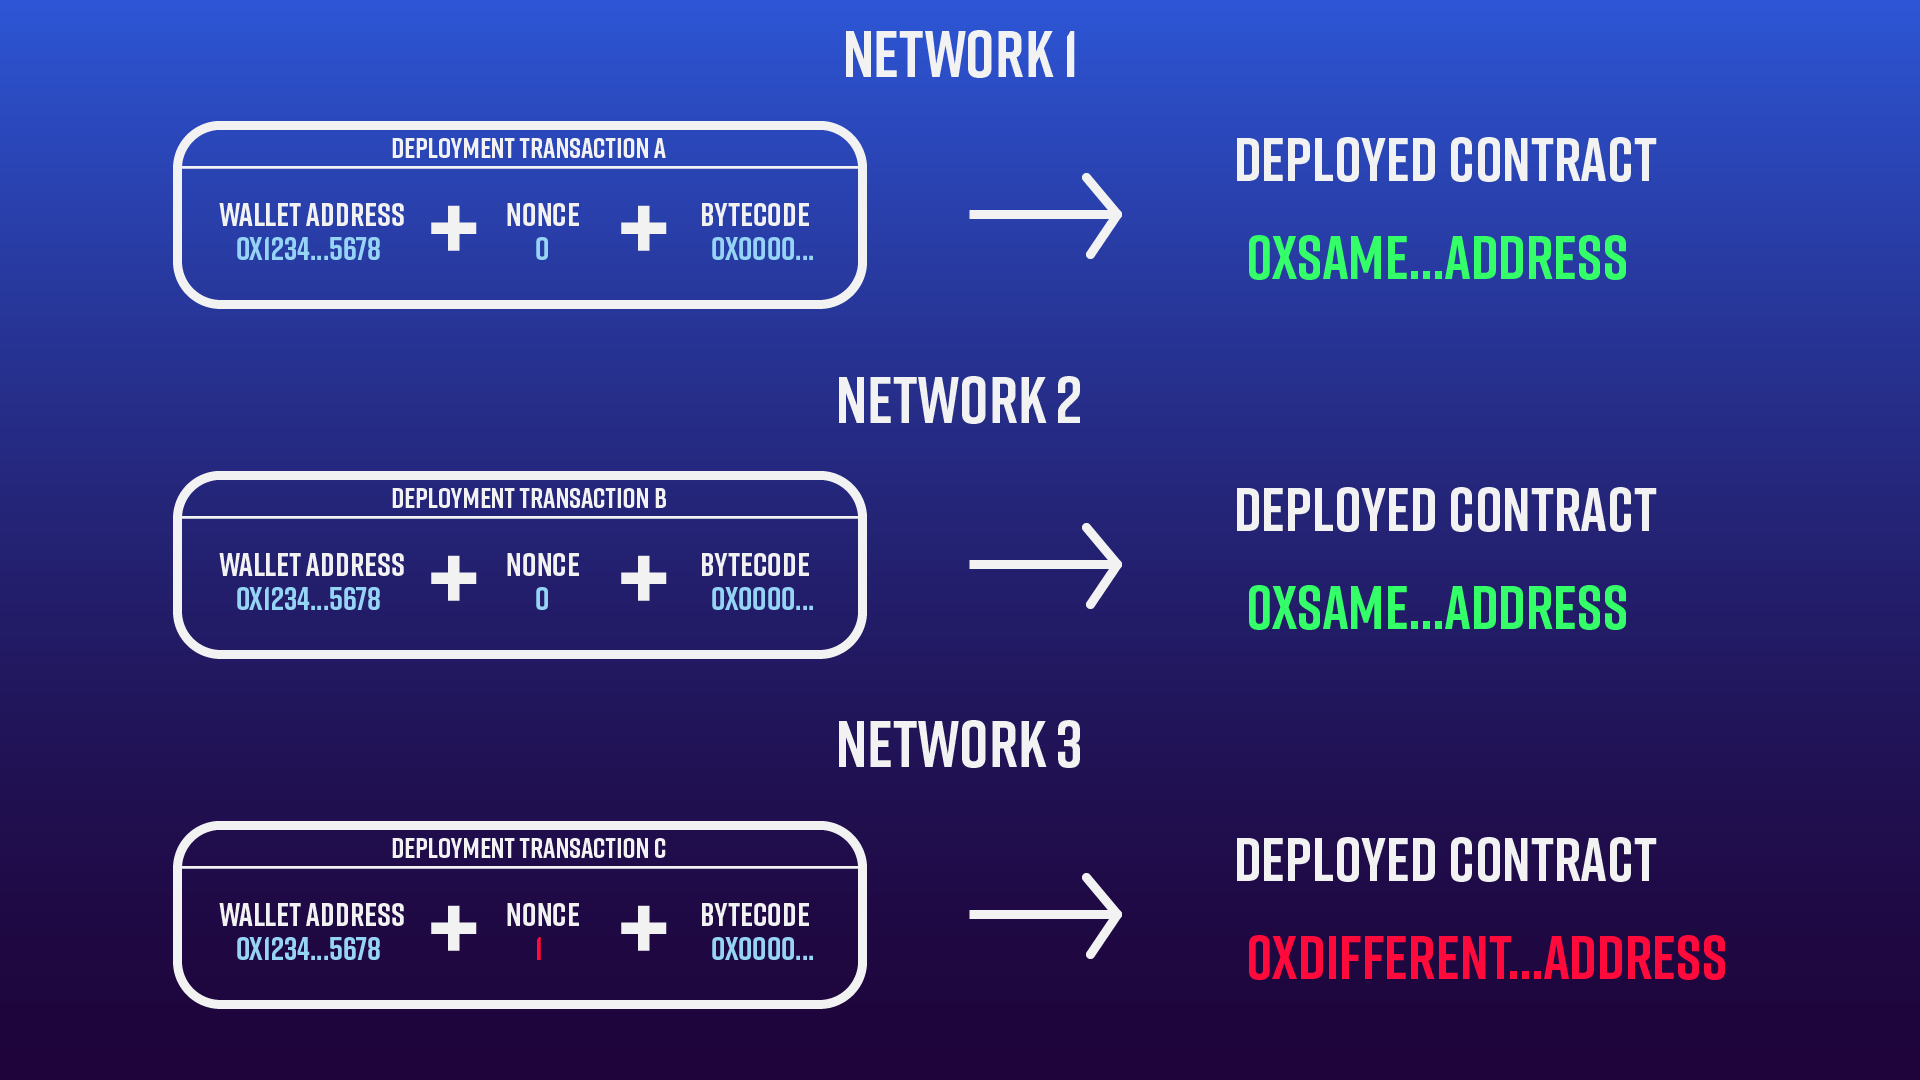
In the image above, transactions A and B are identical and so will deploy the contract to the same address on both networks. In transaction C, however, the nonce is different and thus changes the deployed contract address. Now that we know what conditions need to be satisfied to deploy deterministically, let’s deploy some contracts!
Overview
Part 2: (Create2: An Alternative to deriving contract addresses ->)
Prerequisites
Before you begin this tutorial, please ensure you have the following:
-
An Alchemy account (Create a free Alchemy account).
-
An Ethereum address or MetaMask wallet (Create a MetaMask wallet).
-
Node.JS (>14) and npm installed (Install NodeJs and NPM)
Connect to Alchemy
In this tutorial, we will deploy deterministically to the following test networks:
-
Ethereum Goerli
-
Ethereum Sepolia
-
Polygon Mumbai
-
Arbitrum Goerli
-
Optimism Goerli
Whenever possible, use the Sepolia testnet as all other current POW testnets will be depreciated post-merge.
While you can use the Goerli testnet, we caution against it as the Ethereum Foundation has announced that Goerli will soon be deprecated.
We therefore recommend using Sepolia as Alchemy has full Sepolia support and a free Sepolia faucet also.
For each network, we will create a unique Alchemy API key to connect to the five chains above:
Repeat the following steps for each network:
-
From the Alchemy Dashboard, hover over Apps, then click +Create App.
-
Name your app: <Network Name> testing.
-
Select the correct chain and network of your choice.
-
Click Create app.
If successful, your Alchemy Dashboard should look like this:
Example of an Alchemy dashboard with testnet apps
Configure your MetaMask wallet
Because we need our wallet’s nonce to be the same across all networks, we advise configuring a new Metamask wallet to ensure no transactions have occurred. There are two ways to go about this:
-
Option 1: Create an Account
-
Option 2: Import an Account
When you create an account in MetaMask there is no way to delete it from your wallet. Therefore, if you want to later remove the account use the import account
Option 1: Create an Account
To create a new wallet address, open MetaMask, click your profile icon > Create Account, set a name and create a new account:
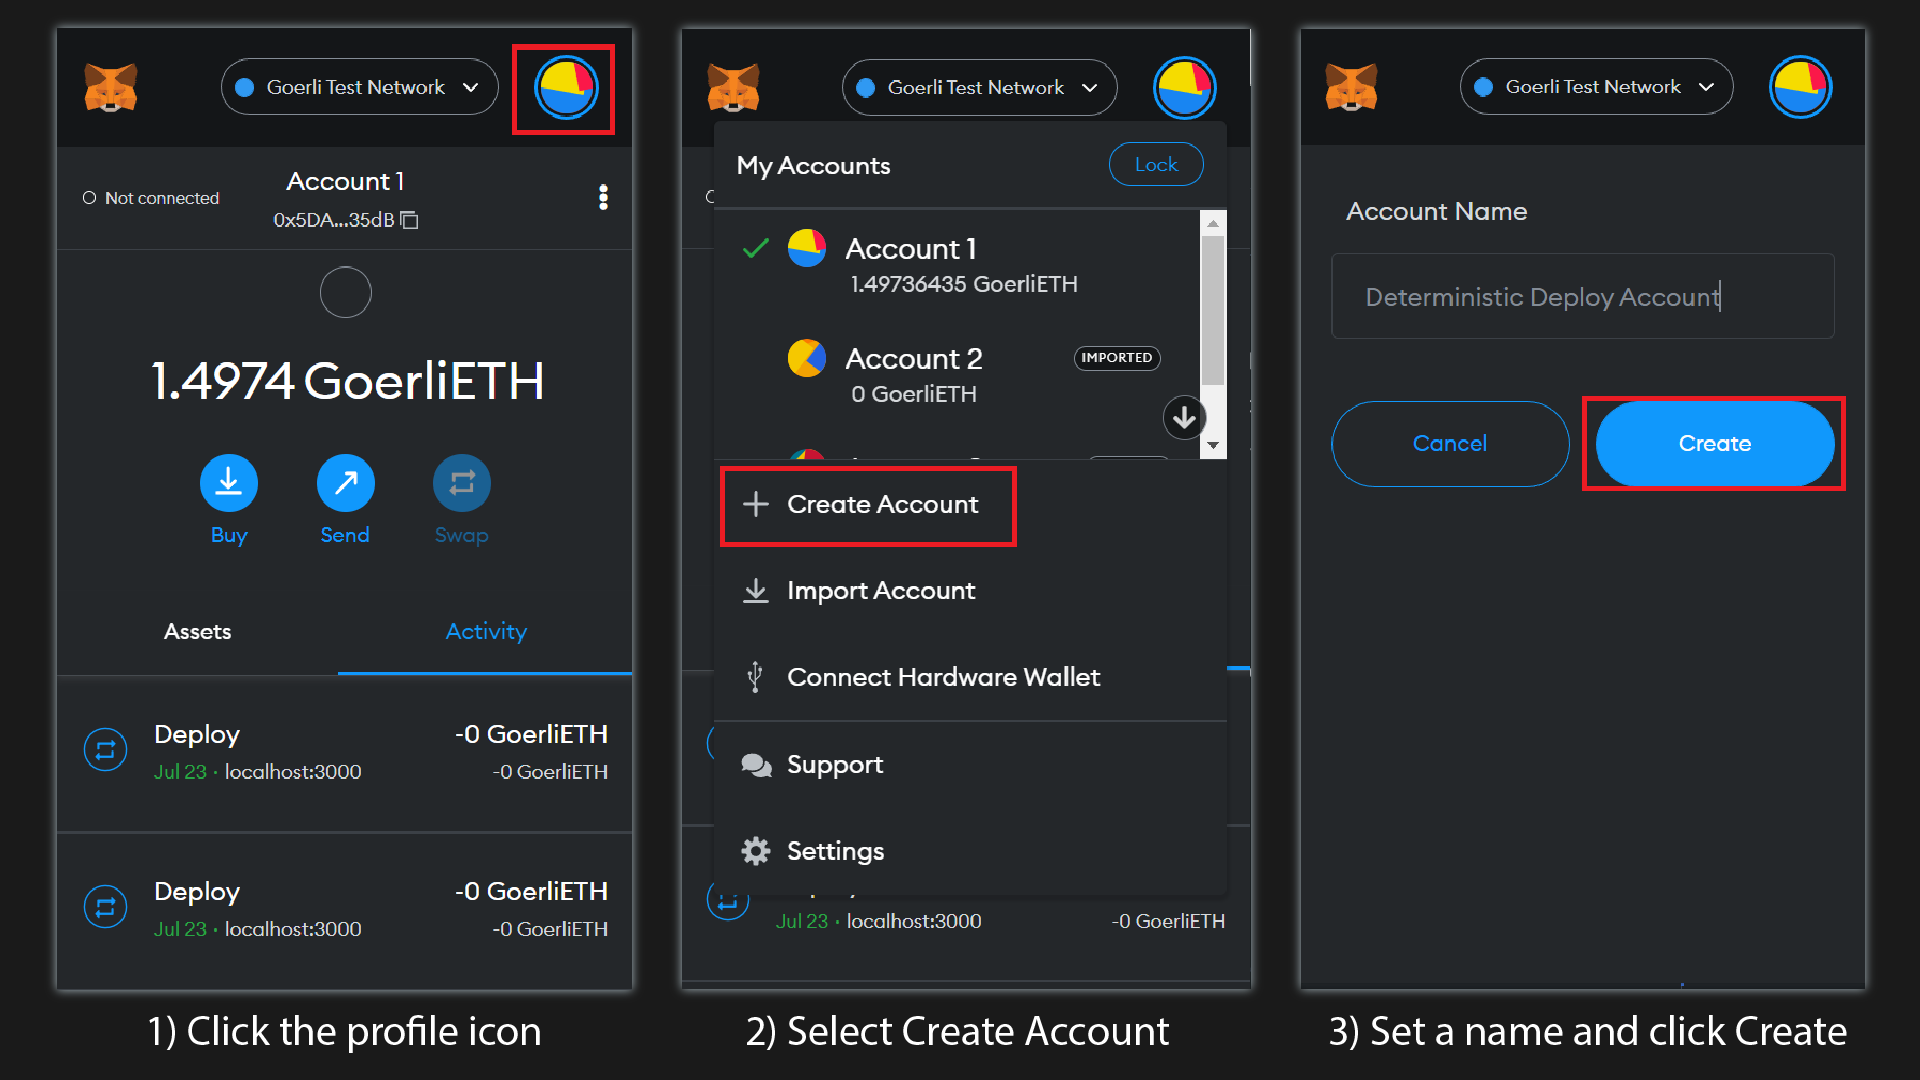
If you want to remove the account later, you can use the method in Option 2 and Import Account instead.
Option 2: Import an Account
You can generate a random private key to import into MetaMask using Node.js. In your terminal, start Node.js with the following command:
Then paste the following into your terminal to generate the key:
In your terminal, you should see an output of a randomly generated private key, similar to the following:
The random secret key above is for demonstration purposes only and will never be used. Remember to never share your private key, especially if you intend to use it!
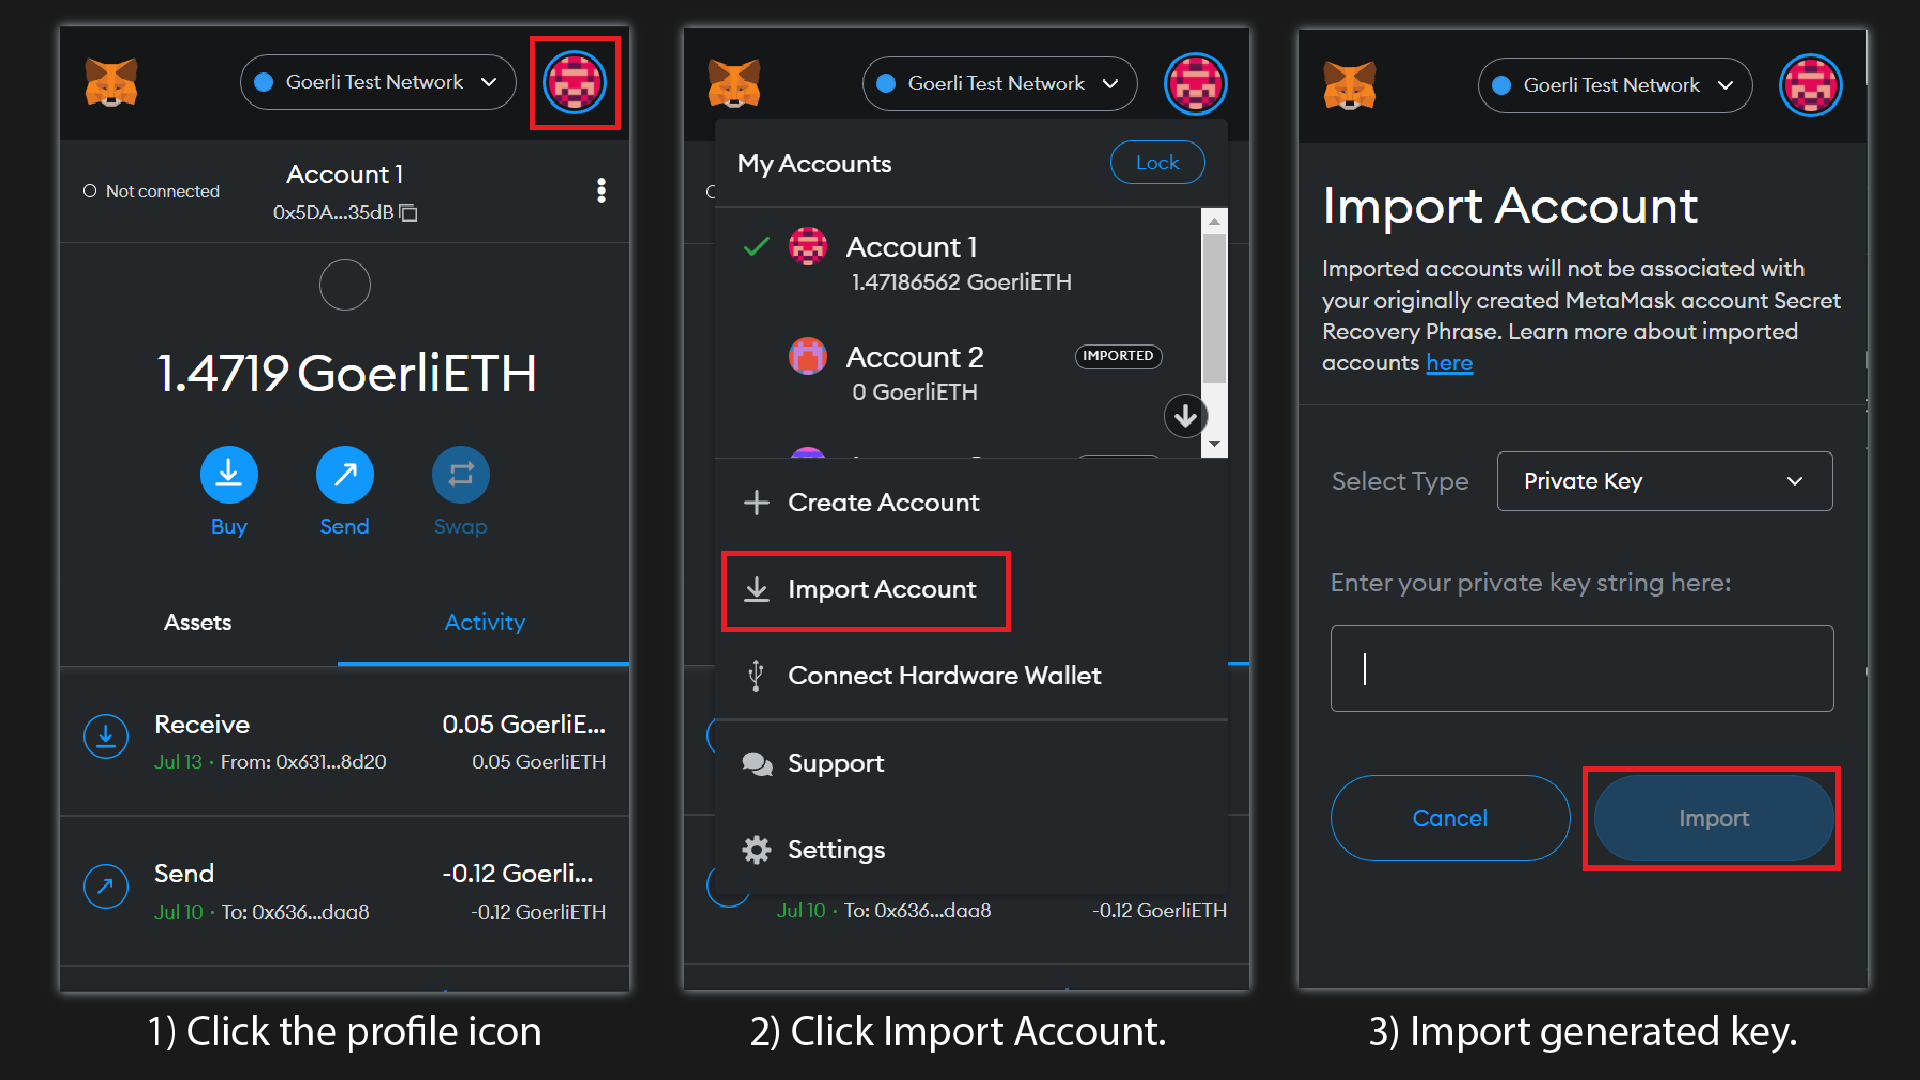
To import a new wallet address, open MetaMask, click your profile icon > Import Account, and enter your key:
Add testnets
For each testnet, we need to add the correct network settings to MetaMask so we can verify that the faucets will deliver the Ether we will request in the next step.
Head to your Alchemy Dashboard. For each app using an L2 network (Polygon,Optimism, and Arbitrum) click Add to Wallet:
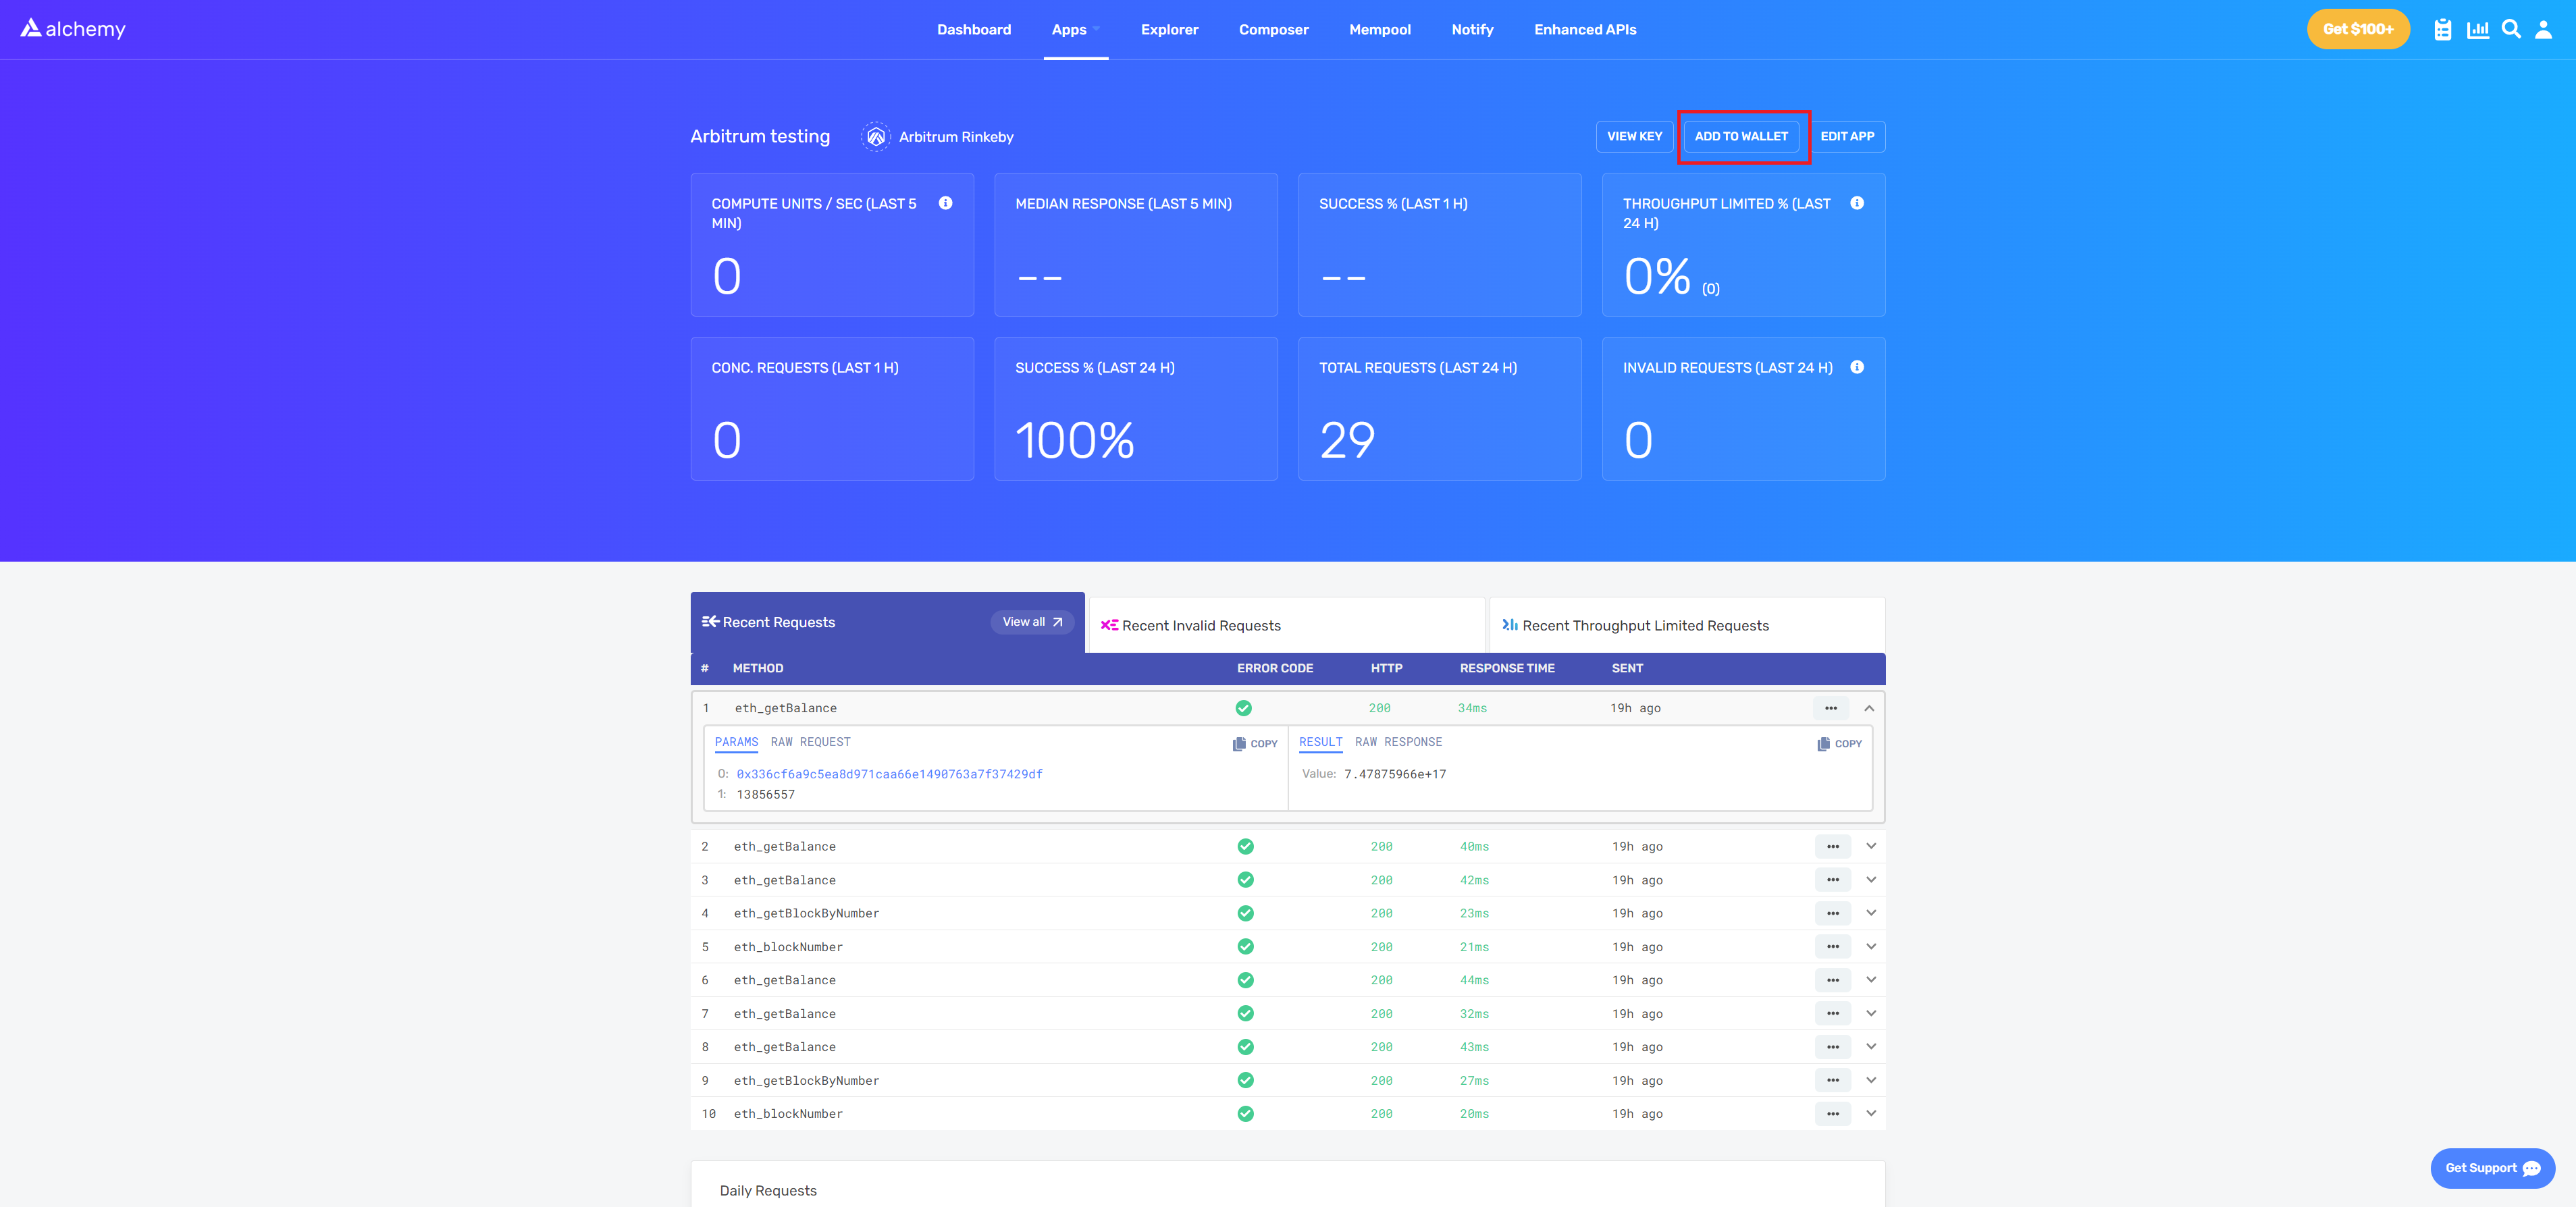
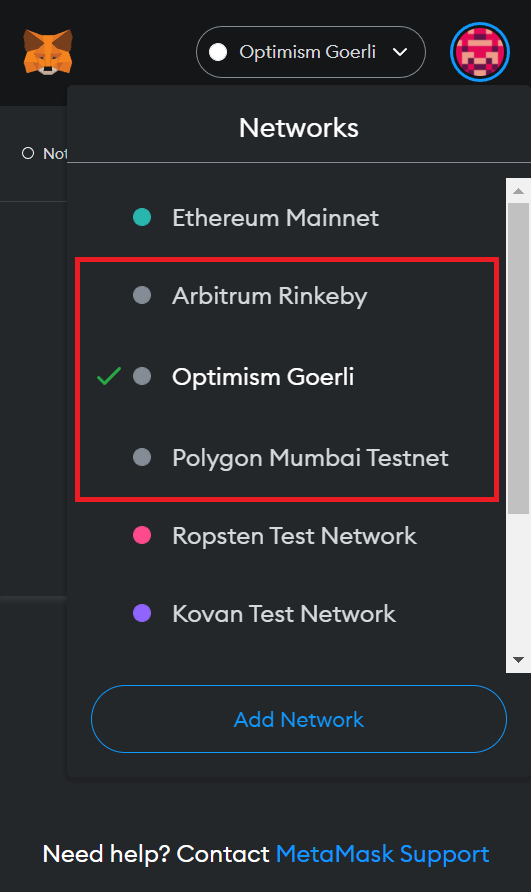
If you enable Show test networks in MetaMask > Settings > Advanced, you should already have the Goerli testnet added by default. If the above was successful, you should have the following networks enabled:
-
Goerli Test Network
-
Polygon Mumbai
-
Optimism Goerli
-
Arbitrum Goerli
See the image below of the manually added testnets.
Request testnet ETH from faucets
To deploy your contract on each testnet, you will need fake test Ether to pay the required network gas fees. Below, you can find some preferred faucets for each network:
Depending on the network traffic, you may have to sign in with your Alchemy account to receive ETH.
First, request Ether from one of the three faucets below. Per the upcoming Goerli deprecation mentioned above, we recommend you use the Sepolia testnet:
After making a request to each faucet, check your MetaMask and ensure you have available balance.
Bridges
Because Arbitrum and Optimism do not have dedicated testnet faucets, you will need to send test Ether to your address on those networks via their respective bridges.
Head to the Arbitrum bridge and set your MetaMask network to Arbitrum Goerli. Then, send some Goerli Ether across to Arbitrum like so:
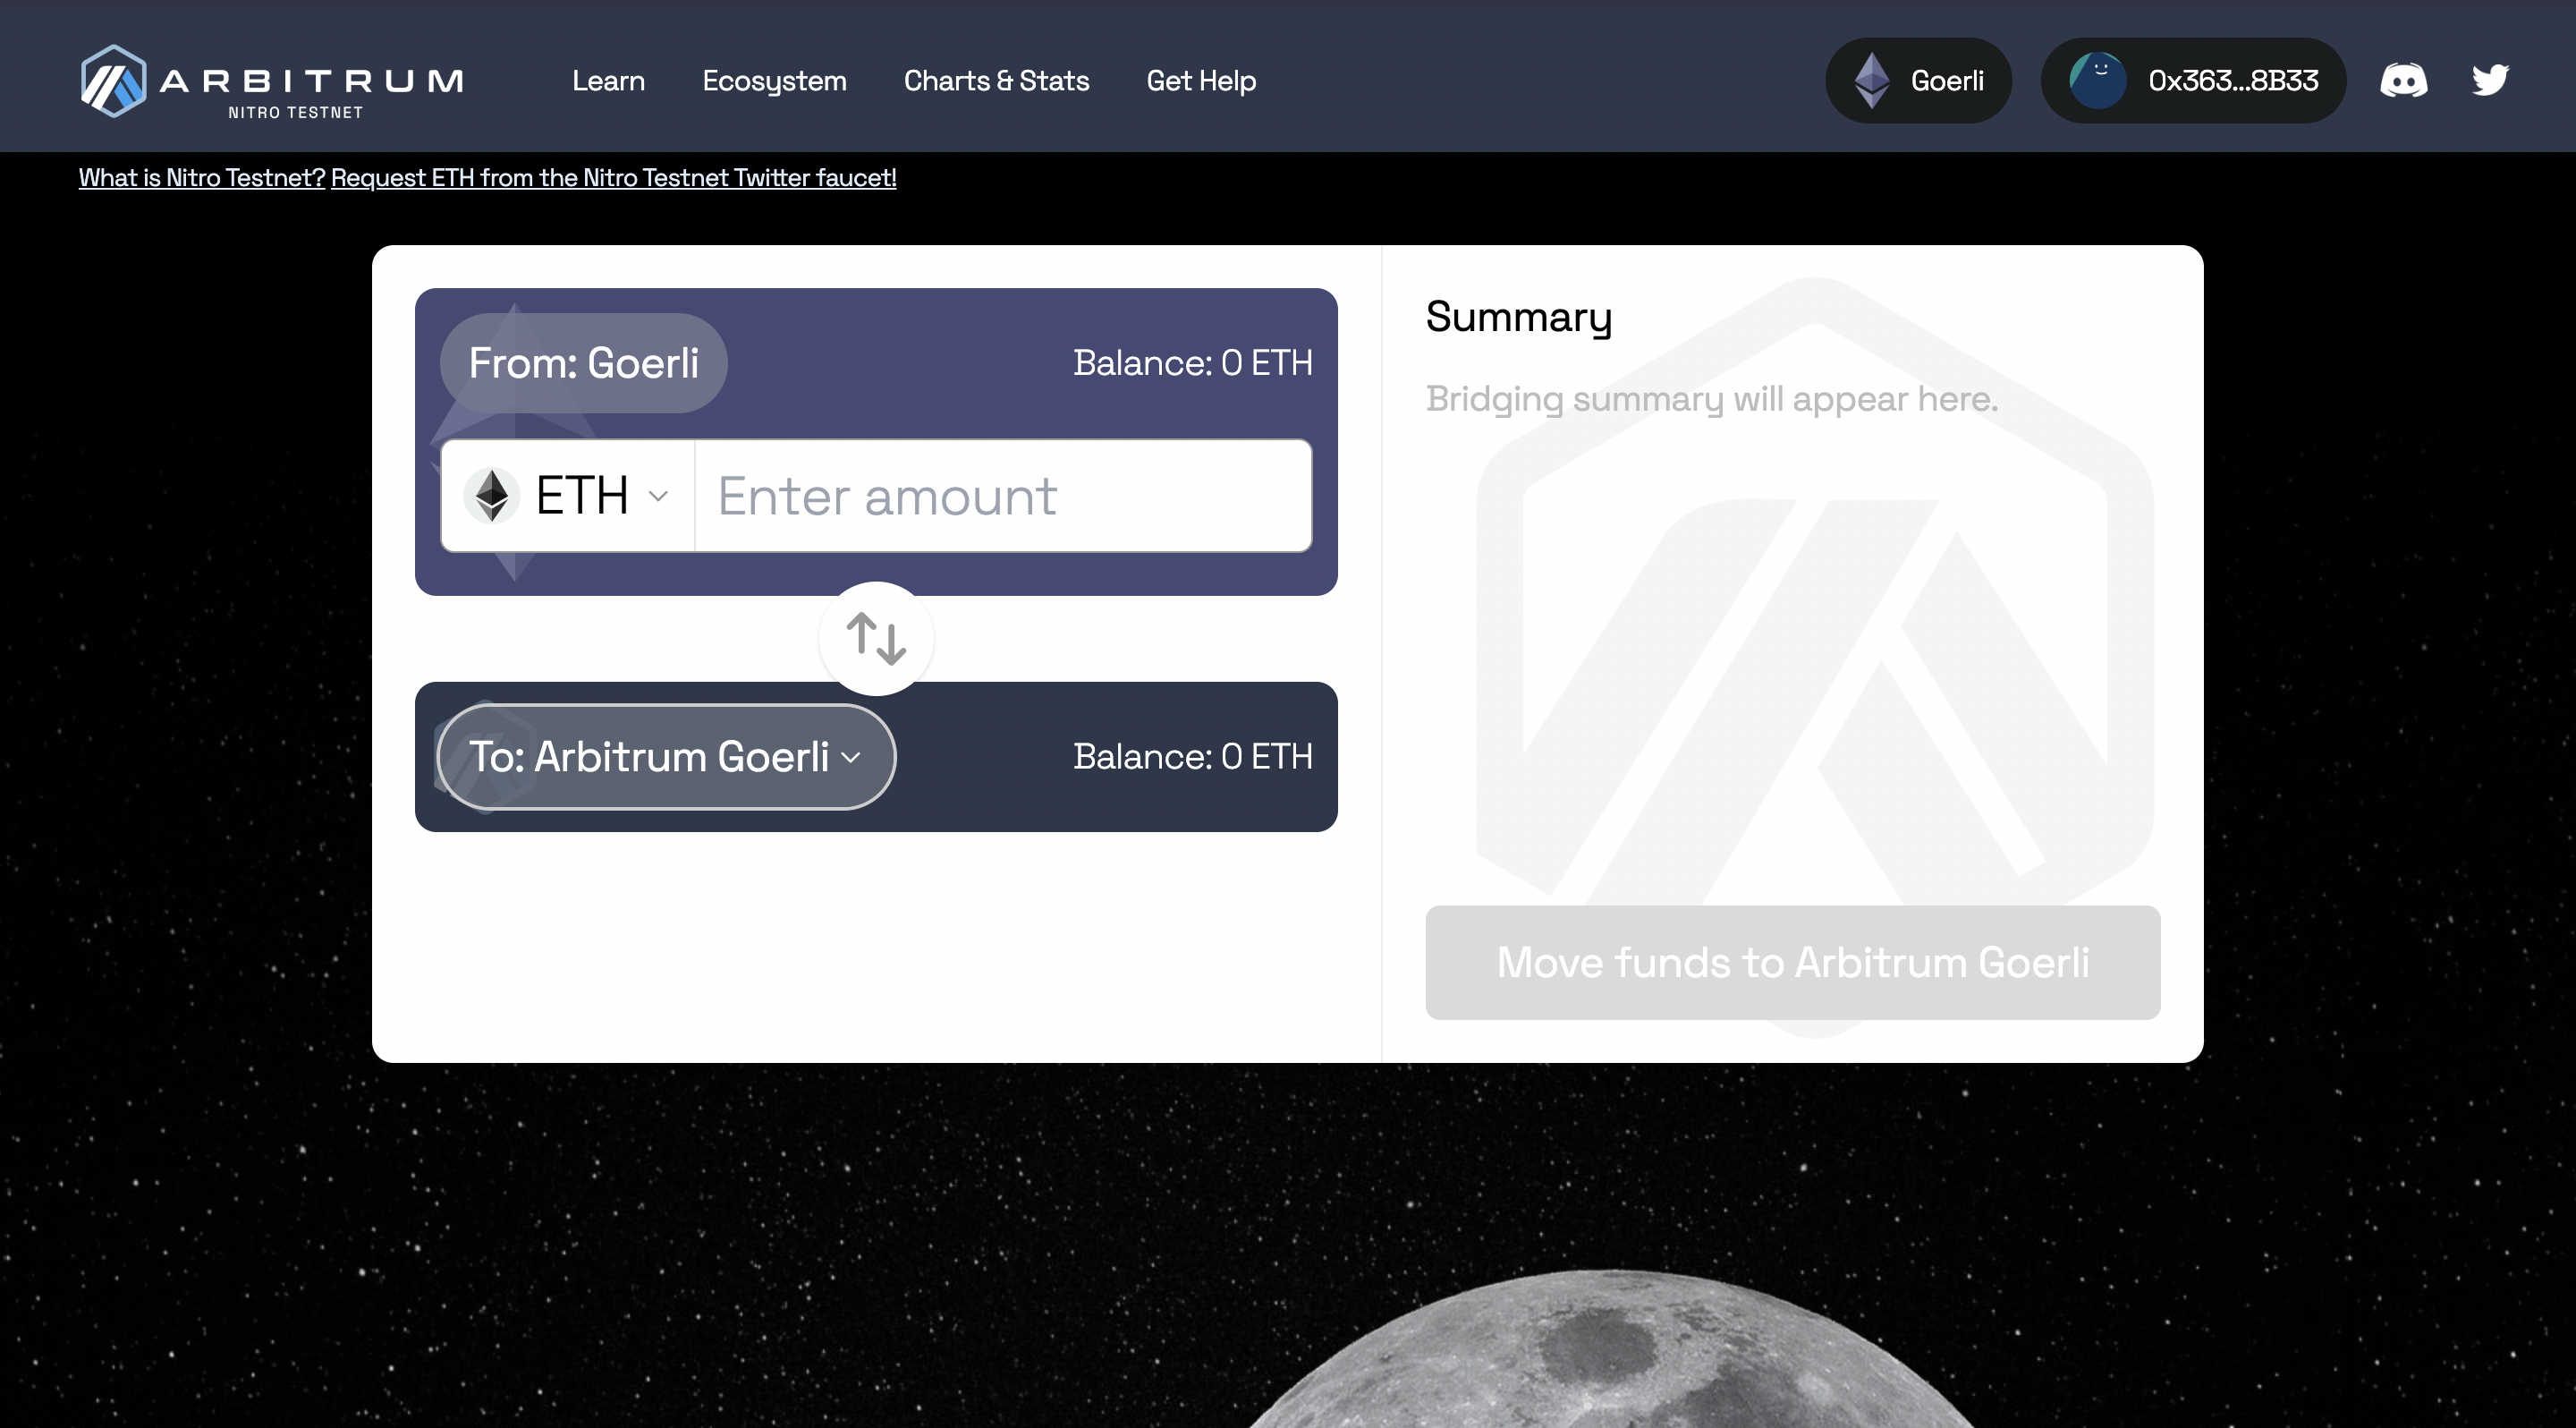
The deposit may take 10 minutes to appear on Arbitrum
Next, send Goerli Ether to Optimism. Because the Optimism Goerli testnet is new, the Goerli bridge UI has not yet been built. However, you can still send Ether across the bridge via the L1 Standard Bridge smart contract.
In MetaMask, change your Network to Goerli Test Network and click Send. Then paste the L1 Standard Bridge contract address: 0x636Af16bf2f682dD3109e60102b8E1A089FedAa8 and send some Ether.
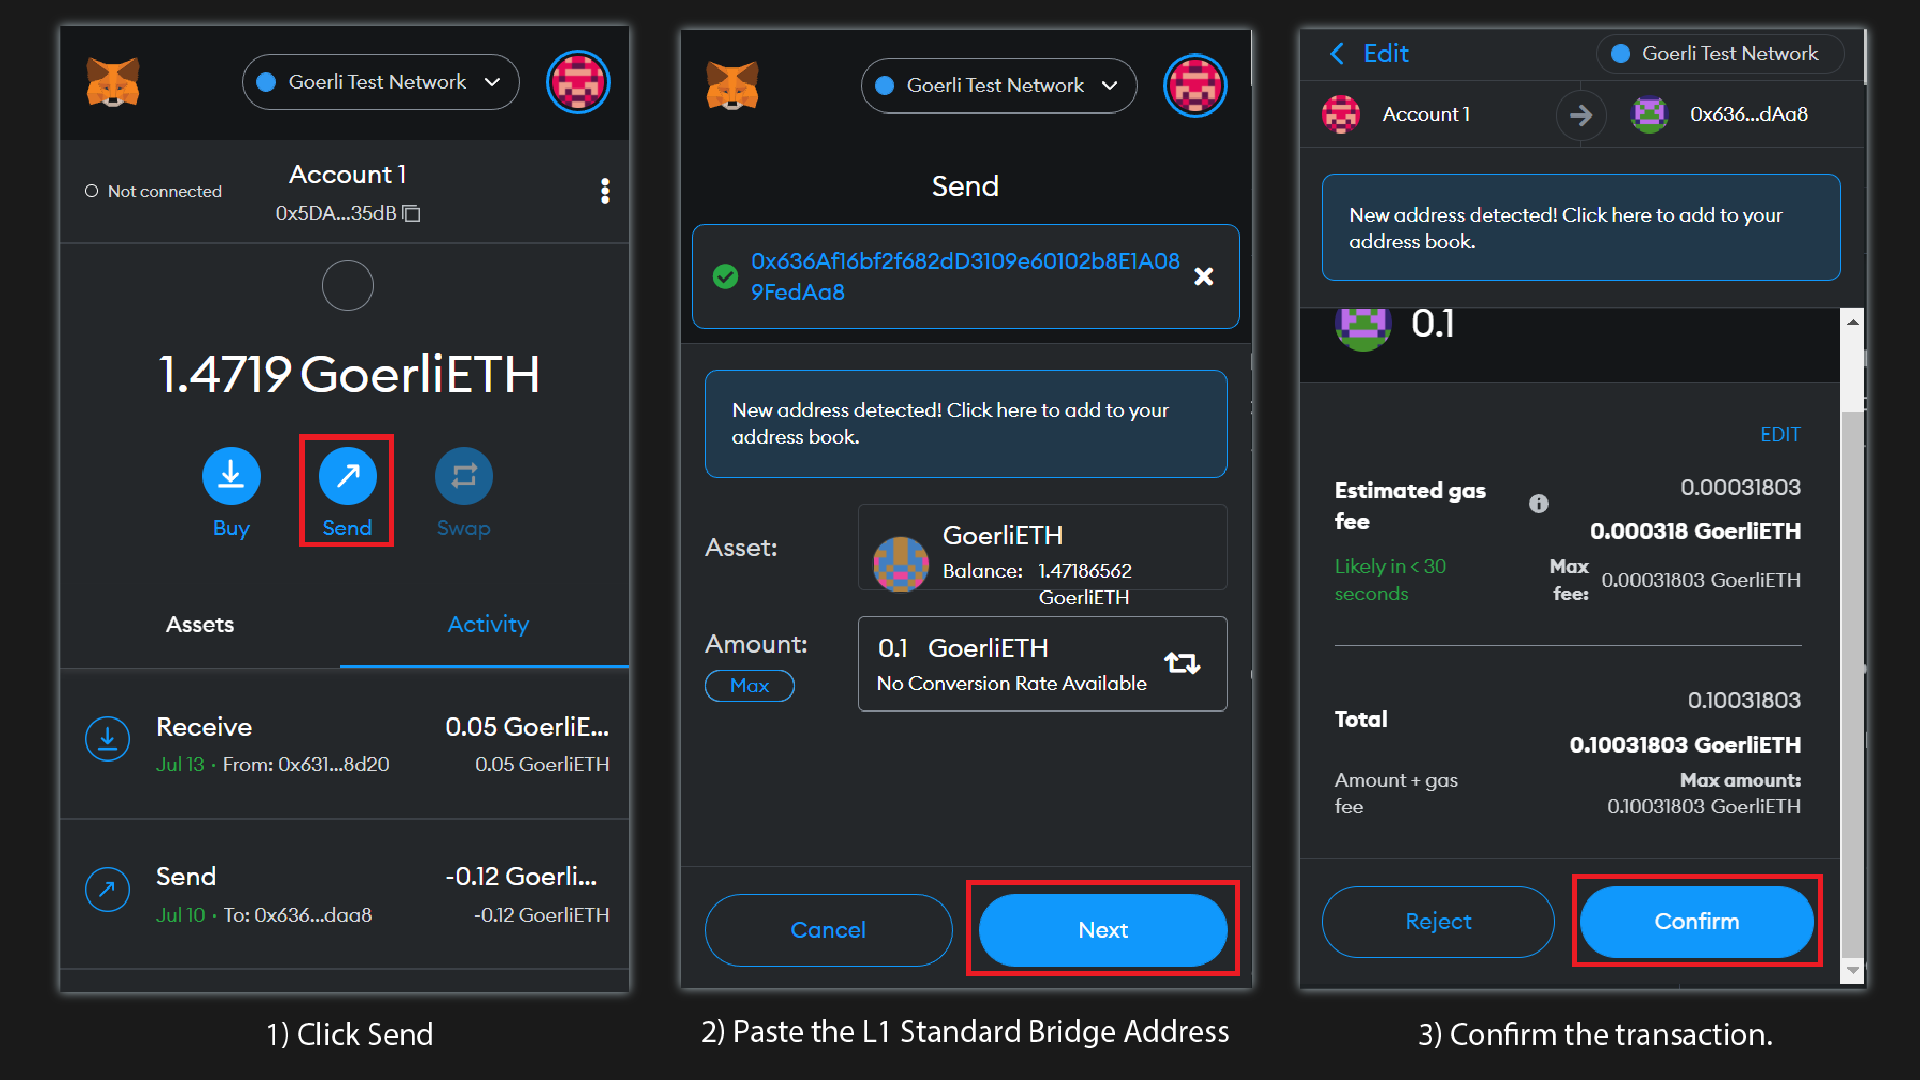
The deposit may take up to 10 minutes to appear in your Optimism Goerli balance.
Because you are sending Ether across the Optimism bridge, this will add to the nonce of your wallet on the Goerli network. Later in the guide, you will send an additional transaction on the other networks to account for this offset.
If all deposits were successful, you should see some Ether in your MetaMask wallet on each of the testnets!
Setup project environment
We will use a Hardhat project to deploy our contracts. For reference, here is the completed version of what we will build in the remainder of this guide.
Open VS Code (or your preferred IDE) and enter the following in terminal:
Once inside our project directory, create the following two directories:
The contracts folder will store our project smart contracts and the scripts folder will contain our deployment and interaction scripts.
Next, initialize npm (node package manager) with the following command:
Press enter and answer the project prompt as follows:
Press enter again to complete the prompt. If successful, a package.json file will have been created in your directory.
Install Hardhat
Hardhat is a development environment that allows us to interact, test, and deploy our contracts within one environment.
To install Hardhat, type the following in terminal:
Once Hardhat is installed create a new project by typing the following command:
Select Create an empty hardhat.config.js. Nice work! With Hardhat installed, we are nearly ready to start coding!
Install environment tools
The tools you will need to complete this tutorial are:
-
hardhat-ethers (A Hardhat plugin that allows us to use the Ethers.js library)
-
dotenv (so that you can store your private key and API key safely)
To install the above tools, ensure you are still inside your root folder and type the following commands in terminal:
Hardhat Ethers:
Alchemy’s Web3:
Dotenv:
Above, we have imported the libraries that we installed and all of the necessary variables to interact with .env
Create a Dotenv File
Create an .env file in your root folder. The file must be named .env or it will not be recognized.
In the .env file, we will store all of our sensitive information (i.e., our Alchemy API key and MetaMask private key).
Copy the following into your .env
-
Replace
{YOUR_ALCHEMY_<NETWORK>_API_KEY}with the respective Alchemy API keys found on Alchemy’s dashboard, under VIEW KEY: -
Replace
{YOUR_PRIVATE_KEY}with your MetaMask private key.
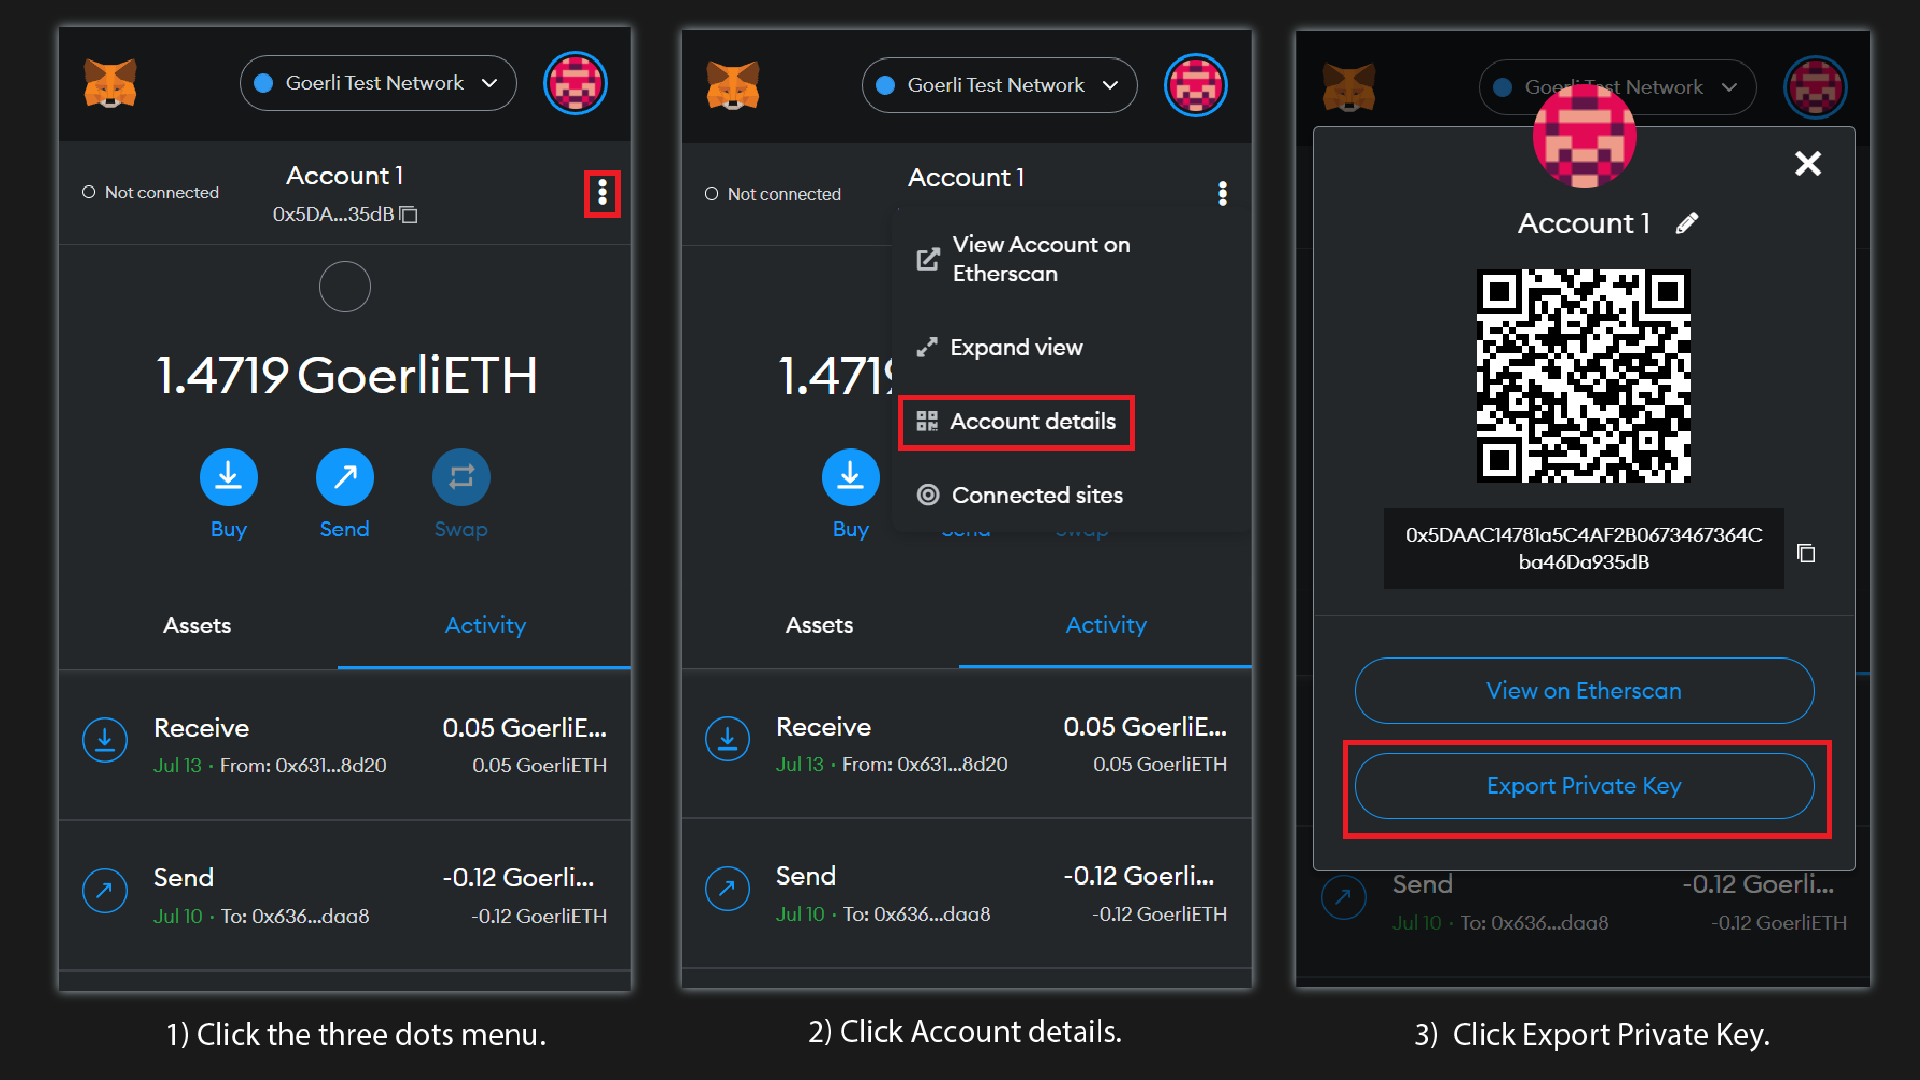
To retrieve your MetaMask private key:
Open the extension, click on the three dots menu, and choose Account Details. Then click Export Private Key:
Edit hardhat.config.js
Add the following statements to the top of your hardhat.config.js file to process your .env file:
Lastly, let’s update the hardhat.config.js file so that we can interact with our API keys and private keys. Add the following networks inside the modules.exports object:
Now that we are finished setting up our Hardhat environment, we can create and deploy some contracts deterministically!
Deterministic deployment setup
In this section of the guide, we will first set up a Hardhat task to query our wallet’s nonce so we can be certain our contract will deploy to the same address on each network. Next, we will create a smart contract and deploy it using a deploy script.
Create a Hardhat task to query the nonce
Hardhat tasks allow us to automate certain processes within the project environment. Because we need to be sure the nonce is identical across all networks, we will create a task that will return the nonce of each network. Additionally, let’s include our wallet balance to ensure we have enough funds to deploy.
Inside your hardhat.config.js file, add the following task above module.exports:
Also within the async function, add a network ID array, provider array, and empty result array:
Lastly, create a for loop to push our requested nonce and balance into the empty result array and print the results to console:
Your completed task should look like this:
Now let’s run our task with the following:
If successful, you should see this result:
Besides Goerli, all of our nonces are 0. This is because of the transaction we sent to the Optimism bridge.
To make all of our nonces equal, let’s send transactions on the other networks and make each nonce equivalent to one. We can send a transaction to our own MetaMask wallet address like so:
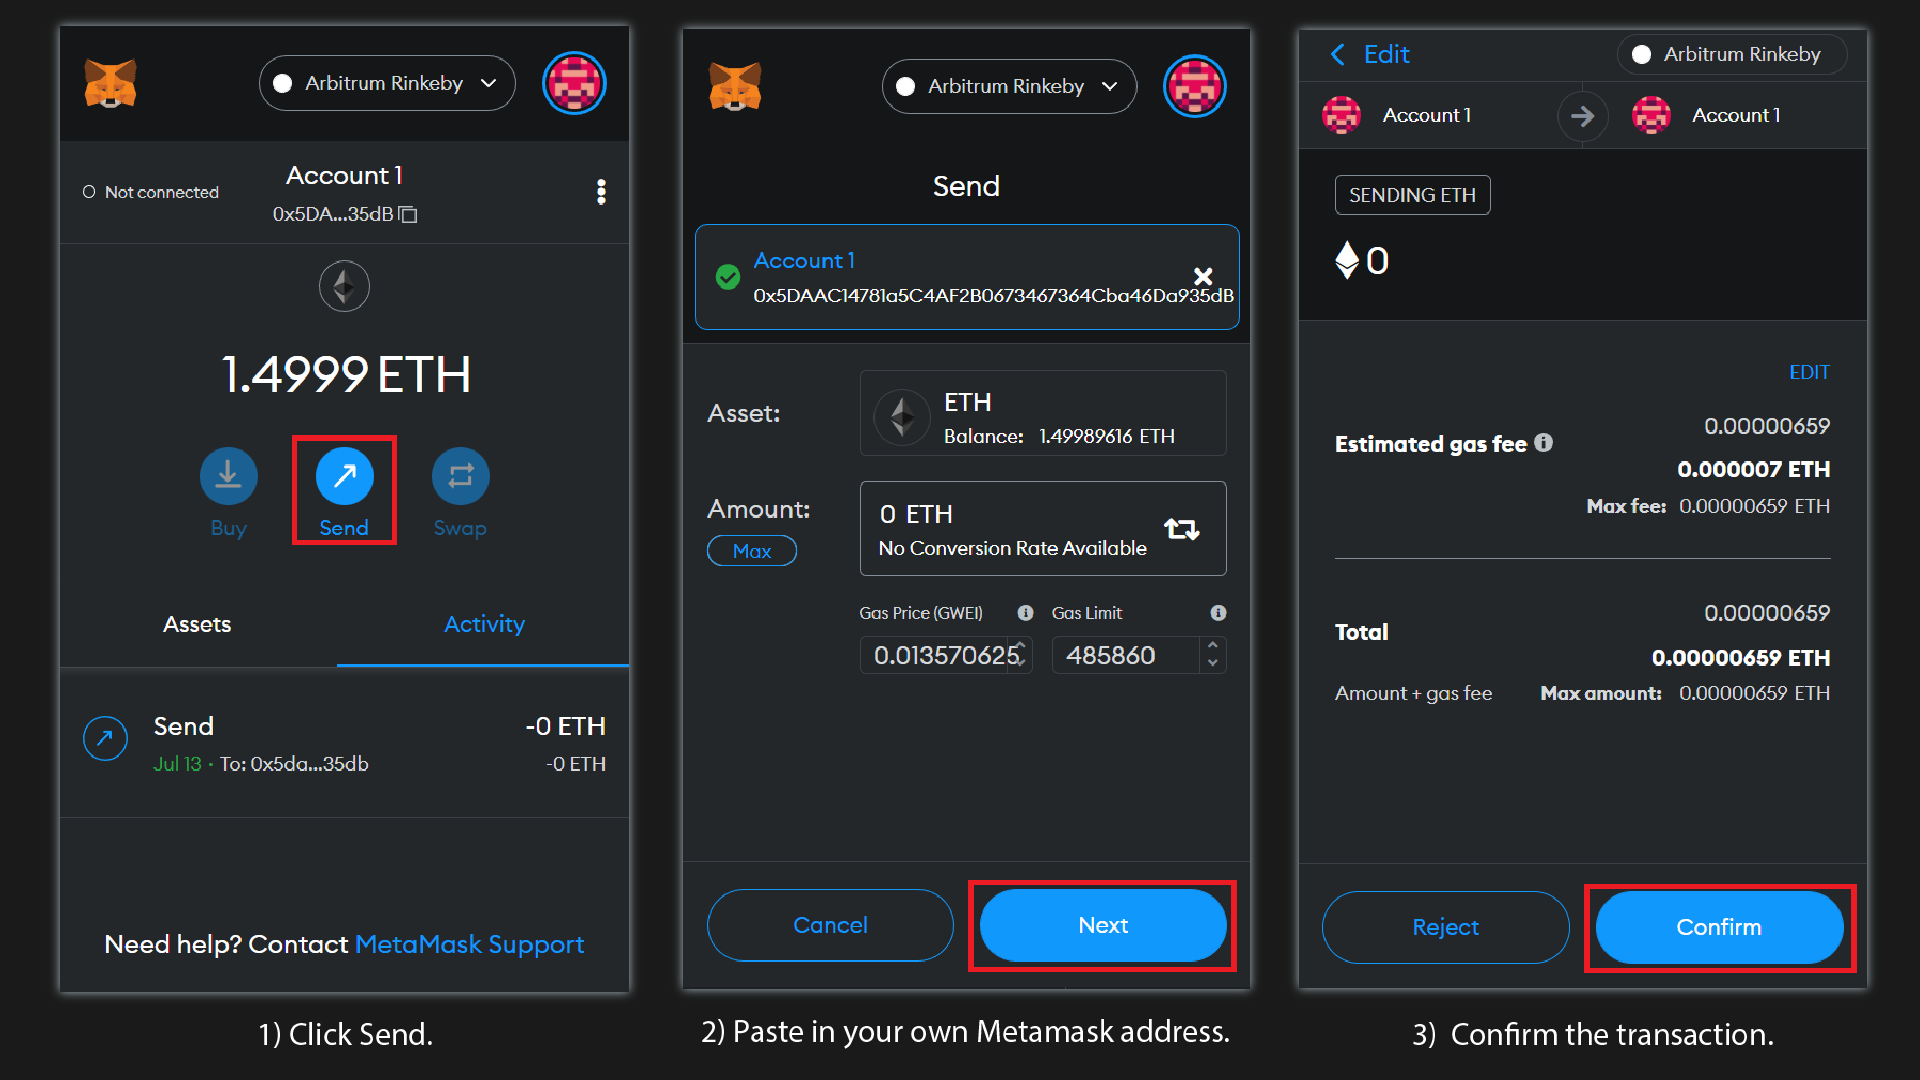
Repeat the same for the other two networks until your nonces are equivalent:
With the necessary setup complete, let’s create and deploy a contract.
Create vault contract
For this tutorial, we will create a vault where funds can be deposited and withdrawn by the owner only after a specified period of time. However, feel free to deploy any contract you would like!
In your contracts folder, create a new solidity file named Vault.sol and add the following lines of code:
Above, we have created a contract with three functions:
-
The
constructor, which runs when our contract is deployed and takes an unlock time. -
The
depositfunction, which we will call to deposit funds to our contract. -
The
withdrawfunction, which will allow us to withdraw funds after the unlock time has expired.
First, let’s add some logic to our constructor function:
Next, let’s create an event we can emit every time the deposit function is called. Add an event above the constructor, and emit it from within the deposit function. The entire contract should look like this:
Lastly, let’s add some logic to the withdraw function. We need to check if the unlock time has passed, then require that the account withdrawing is the owner. Then, we emit an event with the withdrawn balance.
Add a Withdraw event below the Deposit event:
Within the withdraw function body, add the following logic:
Your Vault.sol file should look like this:
Awesome! Our Vault contract is complete. Before we move on to writing the deployment script, let’s compile the contract by typing the following in the terminal:
If successful, Hardhat will return:
Vault deploy script
In your scripts folder, create a file named vaultDeploy.js:
Above, the unlock time is set using a Unix timestamp.
Before we continue, let’s compile our contract with the following Hardhat command:
If successful, you should see:
Before deploying, ensure you replace unlockTime with your Unix timestamp and run the deploy script for each network with this Hardhat command:
If successful, your vault contract will deploy on each testnet to the same address:
To check the status of your deployment, search the following blockchain explorers for your contract address:
At this point in the tutorial, we’ve deployed a contract on each test network to the same address. Having set the nonces, we can guarantee this result. However, there are some downsides to this method:
-
Maintaining the nonces can be a hassle. For instance, if you need to use the address to sign a transaction on one network, you must ensure you update the nonces on all other networks if you want to deploy another contract deterministically.
-
Although the contract deploys to the same address, there is no way to predetermine what that address will be in the counterfactual.
If you plan to deploy only one contract and know that no future transactions will need to be signed, setting the nonces may be a simple option for deterministic deployment.
In Part 2 of this tutorial, we will address the above downsides by adding a more robust alternative to deployment that does not rely on setting the nonces.
Appendix (Optional interaction scripts)
Below are optional interaction scripts to deposit and withdraw for your Vault contract. These are not necessary to complete the tutorial but provide a way to interact with the contract.
Vault deposit script
Before we deploy, we need to write a script to interact with our deposit function. In your scripts folder, create a file named vaultDeposit.js. Add the following async function and catch statement:
Inside the deposit function, add the following statements:
Replace the vault address variable with your deployed address.
Here, we have set the deposit amount to 0.001 Ether and added the necessary variables to connect to the contract once it is deployed.
Now that we are “connected” to the contract, let’s call the deposit function and send our deposit amount. Then, let’s wait for the transaction receipt and print the deposit event to console:
Your vaultDeposit.js file should look like this:
Vault withdraw script
Since we want to withdraw our test Ether after the timer is up, let’s create a withdraw script.
In your scripts folder, create a file named vaultWithdraw.js and add the following async function and catch statement:
Inside the function body, repeat the ethers connection statements from the deploy script:
Next, let’s call the withdraw function on the Vault contract, wait for the transaction receipt, and print the withdraw event to console:
Your vaultWithdraw.js file should look like this:
Now, let’s use our deposit script to send some Ether to the Vault. Run the following commands:
If successful, the script will return the deposited amount of Ether:
Finally, let’s withdraw the Ether we just sent to our vault. Keep in mind, If your unlock timer has not expired, the transaction will fail. If you know the time has expired, run the vaultWithdraw.js script with the following Hardhat command:
If successful, you will see the withdraw event in console:
What’s Next