Which Optimism node is best? Public vs. Private vs. Self-Hosted
Written by Alchemy
To retrieve data from Optimism, dApp’s need to send requests through RPC nodes. In this article, we will explore the different types of nodes available to support web3 development on Optimism.
What is Optimism?
Optimism is an Ethereum layer 2 (L2) scalability solution that leverages the power of optimistic rollups to enable up to 2,000 transactions per second. Optimism designed and maintains their blockchain with a clear set of core design values.
Simplicity
Pragmatism
Sustainability
Optimism
What is an optimistic rollup?
An optimistic rollup uses the security of Ethereum to improve throughput and latency on Ethereum’s base layer by moving computation and data storage off-chain. Optimism creates a rollup of many transactions made on their layer 2 chain, bundling them as one. Then, the rollup protocol optimistically assumes the validity of all these transactions and submits rollup to the Ethereum L1 chain.
What are Optimism nodes?
An Optimism node is a program running on a single computer that allows builders and traders to connect with the rest of the Optimism blockchain network. There are two main components involved with Optimism nodes: the Data Transport Layer and the Client Software.
Data Transport Layer (DTL)
The Data Transport Layer serves as a contact between Optimism and Ethereum. Hosted on Ethereum is a smart contract — the CanonicalTransactionChain (CTC) contract — containing a list of all the blocks published to the Optimism blockchain.
The DTL regularly constructs the Optimism blockchain on a node by retrieving blocks previously published to the CTC. Without the DTL, Optimism nodes would not be able to stay up to date with blocks constructed by the L2 optimistic rollup.
Client Software
Running next to the Data Transport Layer is the Optimism client software. The Optimism client is nearly identical to a vanilla version of Geth, or Go Ethereum – the most widely used Ethereum client. As such, internally, Optimism is very similar to Ethereum, allowing shared EVM, identical accounting structures, gas metering, and more.
A huge benefit of developing on Optimism is that most tools that work on Ethereum will also work on Optimism, with little-to-no code changes.
Why do you need an Optimism node?
Building an Optimism application requires publishing transactions through the optimistic rollup, to the CTC. Additionally, Optimism nodes allow dApps to retrieve data about Optimism’s blocks. To support a high-performing dApp on Optimism, a well-functioning node is a must-have.
Types of Optimism Nodes
There are several options for connecting your dApp to an Optimism node including private Optimism nodes, using Optimism's public RPC node endpoint, and running your own, self-hosted node.
Most Optimism developers will use a private RPC endpoint from an Optimism node provider like Alchemy because Public endpoints and self-hosted nodes have numerous downsides including lower throughputs, higher setup costs, and more engineering maintenance support required.
1. Public Optimism Nodes
Alchemy manages Optimism's primary public endpoint and it can be accessed using this endpoint URL: https://mainnet.optimism.io.
Although there is support for public endpoints, Optimism emphasizes that public RPC endpoints are not at all suitable for production use.
The public Optimism endpoints will rate-limit applications, and often only support limited JSON-RPC methods.
2. Private Optimism Node Provider
If the lack of throughput of Optimism's public node is limiting your application or trading, a private Optimism RPC endpoint from a dedicated Optimism node provider will give engineers access to reliable and scalable Optimism nodes.
Alchemy is Optimism's recommended node provider. Along with the most reliable Optimism node performance in web3, Alchemy providers Optimism developers with a range of a host dev tooling including, Alchemy Build, Monitor, and Optimism webhooks, which are all designed to give you the best Optimism developer experience.
How to Start Using A Private Optimism RPC Endpoint with Alchemy
Alchemy offers a robust free tier, allowing you to get started with a reliable private Optimism RPC endpoint.
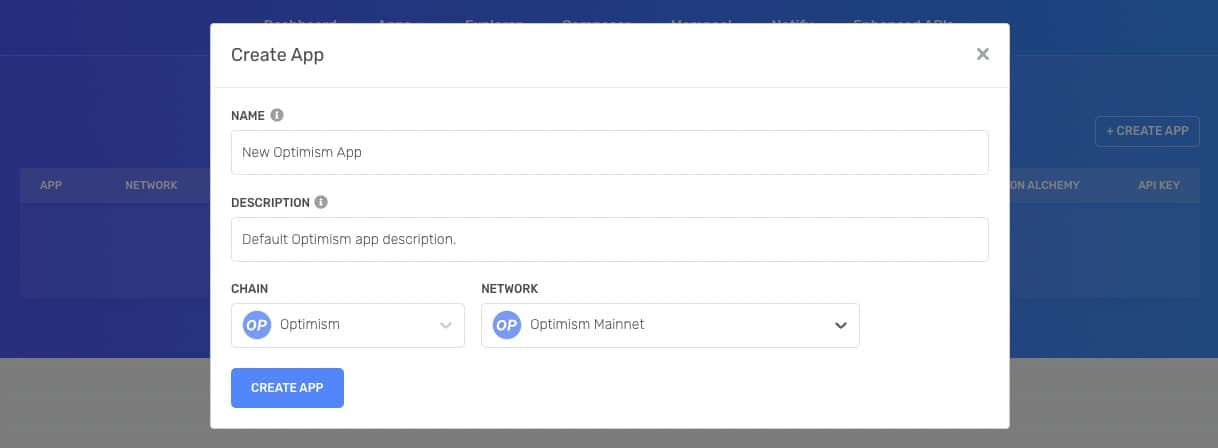
To create a new Optimism app in Alchemy:
Sign up to create a Free account or sign into your existing account
Click the "Create App" button at the top right of the dashboard

Now fill out the following fields including:
Naming your app
Writing a description
Choosing "Optimism" as your "Chain"
Selecting "Optimism Mainnet" as your Network
If you want to create or migrate an application on Optimism's Goerli testnet, you can chose the testnet in the "Network" dropdown menu.

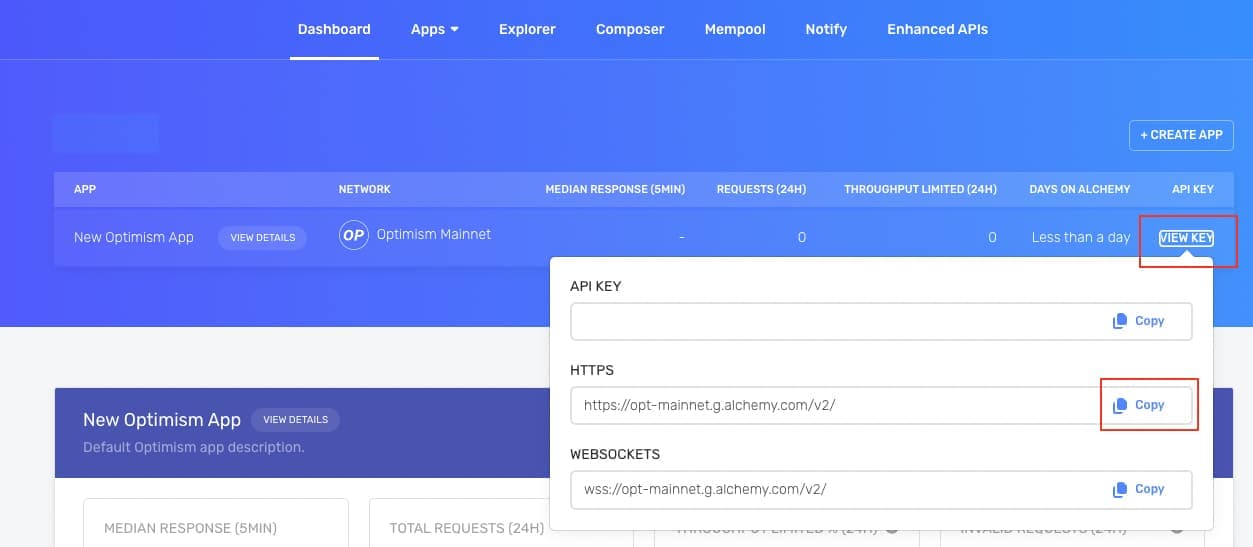
Next, Click the "View Key" button on the dashboard to view your HTTPS key and begin sending requests to your new node!

Now, replace your Optimism RPC URL in your application to start sending traffic through a dedicate Optimism endpoint provided by Alchemy.
3. Self-hosted Optimism Nodes
To have complete control over their node's configuration and implementation, developers may choose to run their own Optimism nodes (i.e. self-hosted nodes).
The first step in setting up an Optimism node is deciding on your node’s hardware. For this, Optimism recommends systems with:
At least 16GB RAM
An SSD (Solid State Drive) with at least 100GB free space
After deciding on hardware, Optimism provides directions for two methods to set up your self-hosted node: a configuration using Docker, and a configuration without Docker.
Below are summaries of the two approaches to setting up an Optimism node. If you decide to set up a node, follow Optimism’s node configuration instructions.
1. Docker Configuration
Optimism’s recommended method for setting up a self-hosted node is to use their provided Docker images.
By using a Docker image for your node setup, you get to skip many configuration steps as the images already have most configuration settings.
Here is a high-level overview of the steps using a Docker configuration:
Clone the node Github repository on your machine
Configure the node settings
Run your self-hosted Optimism node
For step two, you will have to provide multiple other nodes, another L2 Optimism node and an L1 RPC node.
The secondary L2 Optimism node that will be used by your Optimism node to verify its correctness, and Ethereum (L1) RPC node is used for checking your node’s state roots, and to download L2 blocks from L1 via the CTC (CanonicalTransactionChain)
Optimism recommends that these supporting nodes are from RPC providers.
Using this Docker configuration, your node will benefit from a number of additional features to help you maintain the node.
How does the healthcheck service work?
The healthcheck service will regularly compare your node state to the state of the reference node — confirming your node is syncing properly. A fault detector will scan transactions from the Optimism sequencer and compare the results against transactions computed on your node. Lastly, a locally-hosted dashboard will give you easy access to basic node metrics including fault data, DTL syncing, and more.
2. Non-docker Configuration
If the preconfigured Docker images do not offer enough customization for you, Optimism also describes the framework for setting up a node independently. However, they do not recommend setting up a node this way.
While these instructions are tested, they are not as robust as the Docker configuration. This method comes with the risk of setting up poorly functioning nodes. A summary of the instructions is below.
Install the packages and tools needed to run an Optimism node
The packages and tools you need to install are:
Libusb - a library Geth uses to check for hardware wallets
Node.js - a Javascript runtime
Yarn - a popular Node.js package manager
Go - the programming language
2. Set up the Data Transport Layer
DTL is the first piece of your node software. Here you will download the source code, edit its configuration, and run the layer.
As is the case with the Docker configuration, here you will need to provide your self-hosted Optimism node with another node so it can sync its blocks.
Once running, manage the DTL to make sure it’s syncing correctly with Optimism.
3. Set up the Optimism client
Setting up your Optimism client is the second component of your self-hosted node. You must compile the source code, download and verify the state from Optimism’s genesis, create and configure its environment, run the configuration, and finally start the client.
Running self-hosted nodes is an alternative option for expert web3 developers who want more control over their Optimism node configuration. However, choosing to launch and manage a self-hosted node is more expensive and time-consuming than using an Optimism node provider and developer platform like Alchemy.
Which type of Optimism node is best for me?
In the majority of circumstances using a private Optimism endpoint through Alchemy is the best option. Public Optimism endpoints should not be used for production traffic, and unless you are an expert infrastructure engineer, you should not manage your own Optimism node.
Even if you are a casual trader or dApp user on Optimism, updating your MetaMask wallet with a dedicated Optimism endpoint can provide faster and more reliable service.
Get started today with the most robust, free Optimism node provider tier in the market, and unleash the full power of your dApp with Alchemy.

Related overviews
Explore popular programming languages for onchain apps.
Learn About the Challenges and Solutions Engineers Face for Monitoring Their Dapp's Health
This guide shares best practices on how to best prepare for launching your dapp

Build blockchain magic
Alchemy combines the most powerful web3 developer products and tools with resources, community and legendary support.